The Magic of Query Filter Web Parts
TLDR- Query string filter web parts can be implemented to dramatically reduce the amount of content that needs to be produced, maintained, and updated. They work by reading the current URL and sending a parameter from that to filter list data from a SharePoint list.
Query string web parts can be set up to dynamically display different content from SharePoint lists based on URL parameters. The perfect opportunity to implement these is when page content needs to be displayed in a similar fashion, but with different information being displayed based on various conditions, such as user groups.
With query string web parts, a single page can deliver the information that dozens of similar pages would previously have been required. This will dramatically reduce the time it takes to development, maintain, and update the pages and content.
Creating Query Filter Web Parts
To set up and implement these on a page, do the following:
- Enter “Edit Page” mode while on a SharePoint page.
- On the ribbon bar, select Insert, then “Web Part”. This opens up the available web parts at your disposal.
- Click the “Filters” option, which is where the web part is located. (If the “Filters” category is not available, you need to enable the “SharePoint Server Enterprise Site Collection Features” at the site collection level.)
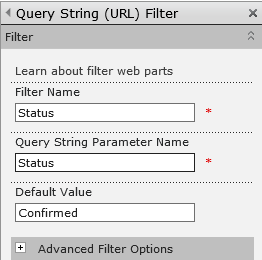
- Now select the “Query String (URL) Filter” web part. (as shown in pic)
Connecting Query String Filters to other Web Parts
- While in “Edit Page” mode, click on the triangle to the right side of the web part you just inserted, and then “Edit Web Part”.
- Create the name of the parameter name you are going to use. For this, I will use the parameter name of “Status”.
- Now you need to connect the web part to other web parts, to enable the list filtering. Click “Connections” -> “Send Filter Values To” -> [select the name of the web part or list you are targeting]. Note- not all WP’s allow for connections, such as the “Content Editor” WP. (If you are using SP 2010 and are unable to open the “Connections” dialog box, try using IE 8-9. The older versions work better with some SharePoint features, in some situations.)
- A modal dialog box will open up, asking you to select which fields to match. Select the fields you desire.
- Once the connection is set, you can test the filtering ability by appending the URL with “?Status=” and the column value form the list you are filtering.
That’s all there is to it.